
 Promise核心重写
框架与库皆是工具,原生为王
# 前言:
Promise 是前端知识体系架构中非常重要的一环
Promise能够通过链式调用then+async await 的方式解决回调地狱的多层级嵌套写法,简化代码写法
Promise在浏览器的执行环境中属于微任务,要比延时器等宏任务执行时机更快。
通读本文,学会以逆向思维拆解ES6新出现的方法的实现
强化类 的封装,原型方法的理解
# Promise 基础使用
        let promise1 = new Promise((resove, reject) => { })
        console.log(promise1);

        let promise2 = new Promise((resove, reject) => {
            resove('成功啦!');
            reject('失败啦!');
        })
        console.log(promise2);

        let promise3 = new Promise((resove, reject) => {
            reject('失败啦!');
            resove('成功啦!');
        })
        console.log(promise3);

        let promise4 = new Promise((resove, reject) => {
            throw ('失败啦!')
        })
        console.log(promise4);
2
3
4
5
6
7
8
9
10
11
12
13
14
15
16
17
18
19
# Promise 功能分析:
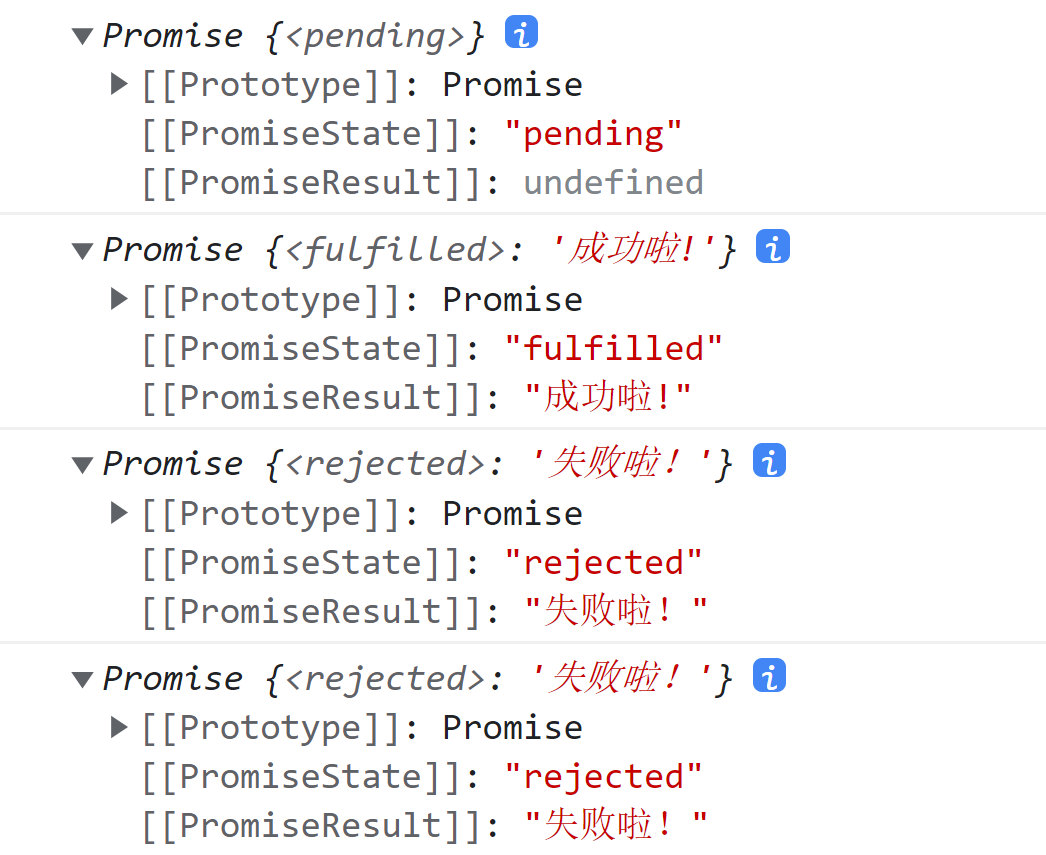
由上面的基础使用方法和输出,可以得到以下的结论
- Promise 有三个状态:PromiseState
执行等待状态:pending 【注:既不调用resove(),也不调用reject() 】
成功结束状态:fulfilled 【注:调用resove()】
失败结束状态:rejected 【注:调用reject() 或者 throw() 】
- Promise 有一个返回数据:PromiseResult
如果一直没有调用resolve 和 reject() 返回数据: undefined
调用 resolve(100) 返回数据就为 resolve() 的回传数据: 100
调用reject(200) 返回数据就为reject() 的回传数据: 200
- Promise 本身是一个类/构造函数
实例化Promise 时需要传入一个函数,
这个函数有两个形参 一个是成功状态下(fulfilled )的回调 resove,一个是失败状态下(rejected )的回调 reject.
# 开始从零实现Promise 核心
# 1.定义Promise 类,并实例化
// 定义Promise 类
class Promise {
    constructor(){

    }
}
2
3
4
5
6
  let p = new Promise();
  console.log(p);
2

# 2.实例化传值和 接收
// 定义Promise 类
class Promise {
    // 通过fn 接收实例化时传递过来的函数
    constructor(fn) {
        // 调用fn函数
        fn()
    }
}
2
3
4
5
6
7
8
   // 传递了一个 函数过去
        let p = new Promise((resolve,reject)=>{
            let a= true;
            if(a){
                resolve(a);
            }else{
                reject(a);
            }
        });
        console.log(p);
2
3
4
5
6
7
8
9
10
这里开始报错,因为实例化传递过去的 fn() 被调用时,需要回传两个参数,resolve 和 reject 这里报错:这两个变量未定义

报错解决思路:
在调用fn函数的时候 传入两个数据,这个两个数据 是 Promise 类上面的两个原型方法: resove() reject()
// 定义Promise 类
class Promise {
    // 通过fn 接收实例化时传递过来的函数
    constructor(fn) {
        // 调用fn函数,传入实例的原型方法
        fn(this.resolve,this.reject)
    }
    // 定义resove原型方式
    resolve(){
        console.log('成功啦');
    }
    reject(){
        console.log('失败啦');
    }
}
2
3
4
5
6
7
8
9
10
11
12
13
14
15

# 3.定义Promise的状态
Promise 的状态特点:
如果不调用 resolve() 获取reject() 原型方法就表示 默认状态: pending
如果调用resolve() 方法 状态就必须 更改为 :fulfilled
如果调用reject() 方法 状态就必须 更改为 :rejected
注:状态只能从 pending 更改为 fulfilled 或者 从 pending 更改为 rejected 【状态不可逆:等待-->成功 || 等待--->失败】
// 定义Promise 类
class Promise {

    // 定义三个状态 作为类的静态属性
    static PENDING = 'pending'
    static FULFILLED = 'fulfilled'
    static REJECTED = 'rejected'
    constructor(fn) {
        // 默认状态 为 pending
        this.PromiseState = Promise.PENDING;
        fn(this.resolve, this.reject)
    }

    resolve() {
        // 如果当前的状态为pending 就更改为FULFILLED
        if (this.PromiseState == Promise.PENDING) {
            this.PromiseState = Promise.FULFILLED;
        }
    }
    reject() {
        // 如果当前的状态为pending 就更改为REJECTED
        if (this.PromiseState === Promise.PENDING) {
            this.PromiseState = Promise.REJECTED;
        }
    }
}
2
3
4
5
6
7
8
9
10
11
12
13
14
15
16
17
18
19
20
21
22
23
24
25
26
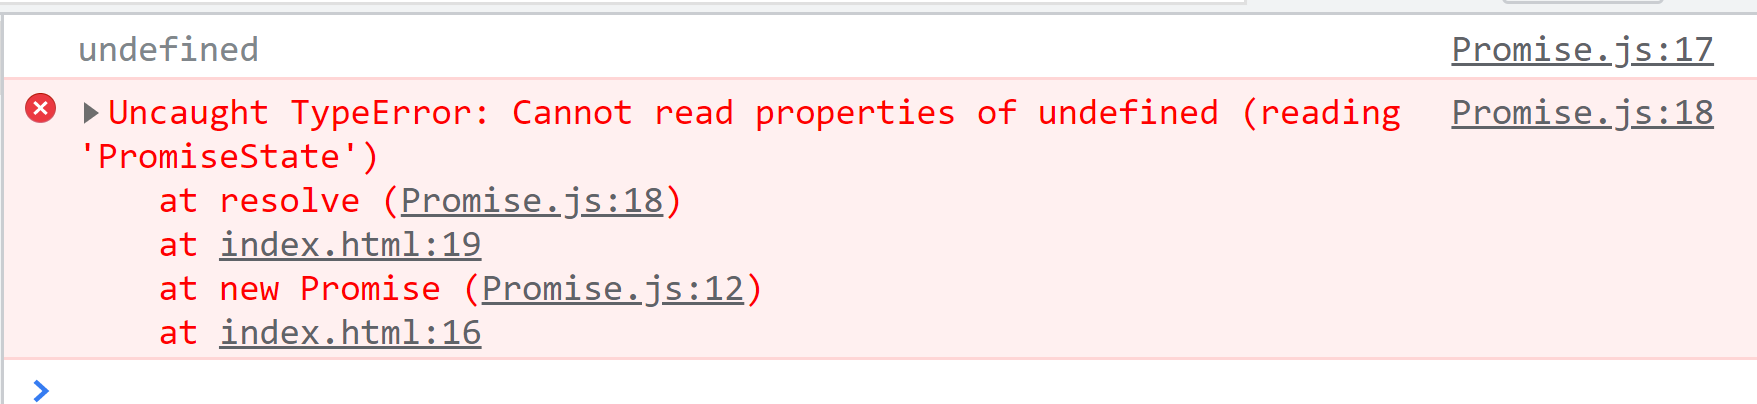
- 重新执行代码,报错,找不到PromiseState
分析报错原因,打印this 的值 得到结论:this在这里的指向已经出问题了,所以报错
    resolve() {
        // 如果当前的状态为pending 就更改为FULFILLED
        console.log(this); //这里打印出来的值 是 undefiend
        if (this.PromiseState == Promise.PENDING) {
            this.PromiseState = Promise.FULFILLED;
        }
    }
2
3
4
5
6
7
- 更改this指向 将当前实例的this 借给 resolve 和reject方法
这里的this 没有拿到真正的实例对象的this 所以需要在执行resovle() 和reject()之前将当前实例 this借过去,
this借用的方式有三种: call apply 【这两种 都是需要立即调用这个函数】 bind 【不需要立即调用这个函数】
这里必须使用bind
// 定义Promise 类
class Promise {

    // 定义三个状态 作为类的静态属性
    static PENDING = 'pending'
    static FULFILLED = 'fulfilled'
    static REJECTED = 'rejected'
    constructor(fn) {
        // 默认状态 为 pending
        this.PromiseState = Promise.PENDING;
        // 通过bind 将resovle 和reject函数中的this 更改为当前实例对象
        fn(this.resolve.bind(this), this.reject.bind(this))
    }
    resolve() {
        // 如果当前的状态为pending 就更改为FULFILLED
        console.log(this); //Promise {PromiseState: 'pending'}  打印正常
        if (this.PromiseState == Promise.PENDING) {
            this.PromiseState = Promise.FULFILLED;
        }
    }
    reject() {
        // 如果当前的状态为pending 就更改为REJECTED
        if (this.PromiseState === Promise.PENDING) {
            this.PromiseState = Promise.REJECTED;
        }
    }
}
2
3
4
5
6
7
8
9
10
11
12
13
14
15
16
17
18
19
20
21
22
23
24
25
26
27
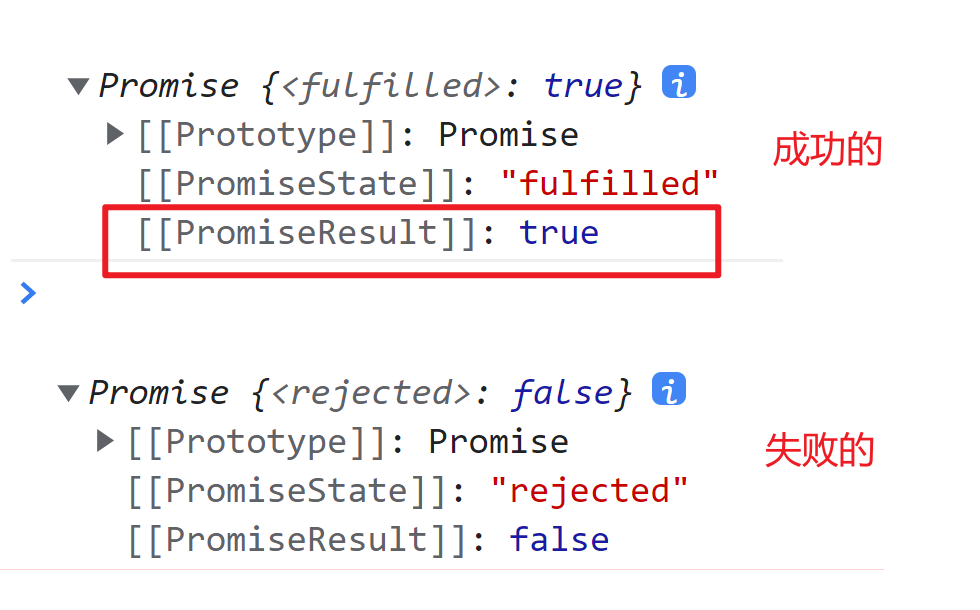
- 测试 成功 和失败的输出
       let p = new Promise((resolve,reject)=>{
            let a= true;
            if(a){
                resolve(a);  //输出
            }else{
                reject(a);
            }
        });
        console.log(p);
2
3
4
5
6
7
8
9

     let p = new Promise((resolve,reject)=>{
            let a= false;
            if(a){
                resolve(a);
            }else{
                reject(a);  //输出
            }
        });
        console.log(p);
2
3
4
5
6
7
8
9
10

# 4.定义成功和失败的返回值
Promise 返回值的特点:
返回值不管是成功或者失败 都会直接写入到 Promise 对象中的 PromiseResult 属性里
直接讲调用resove 和调用reject 传递的实参 写入到 实例属性 PromiseResult 上即可,这里防止调用的时候没有传值,先定一个默认的值 null
// 定义Promise 类
class Promise {
    // 定义三个状态 作为类的静态属性
    static PENDING = 'pending'
    static FULFILLED = 'fulfilled'
    static REJECTED = 'rejected'
    constructor(fn) {
        // 默认状态 为 pending
        this.PromiseState = Promise.PENDING;
        // 给返回值 定义默认值 null
        this.PromiseResult = null;
        // 通过bind 将resovle 和reject函数中的this 更改为当前实例对象
        fn(this.resolve.bind(this), this.reject.bind(this))
    }
    resolve(res) {
        // 如果当前的状态为pending 就更改为FULFILLED
        if (this.PromiseState == Promise.PENDING) {
            this.PromiseState = Promise.FULFILLED;
            // 拿到调用传递的成功数据 赋值到实例对象的PromiseResult上
            this.PromiseResult = res;
        }
    }
    reject(err) {
        // 如果当前的状态为pending 就更改为REJECTED
        if (this.PromiseState === Promise.PENDING) {
            this.PromiseState = Promise.REJECTED;
            // 拿到调用传递的失败数据 赋值到实例对象的PromiseResult上
            this.PromiseResult = err;
        }
    }
}
2
3
4
5
6
7
8
9
10
11
12
13
14
15
16
17
18
19
20
21
22
23
24
25
26
27
28
29
30
31
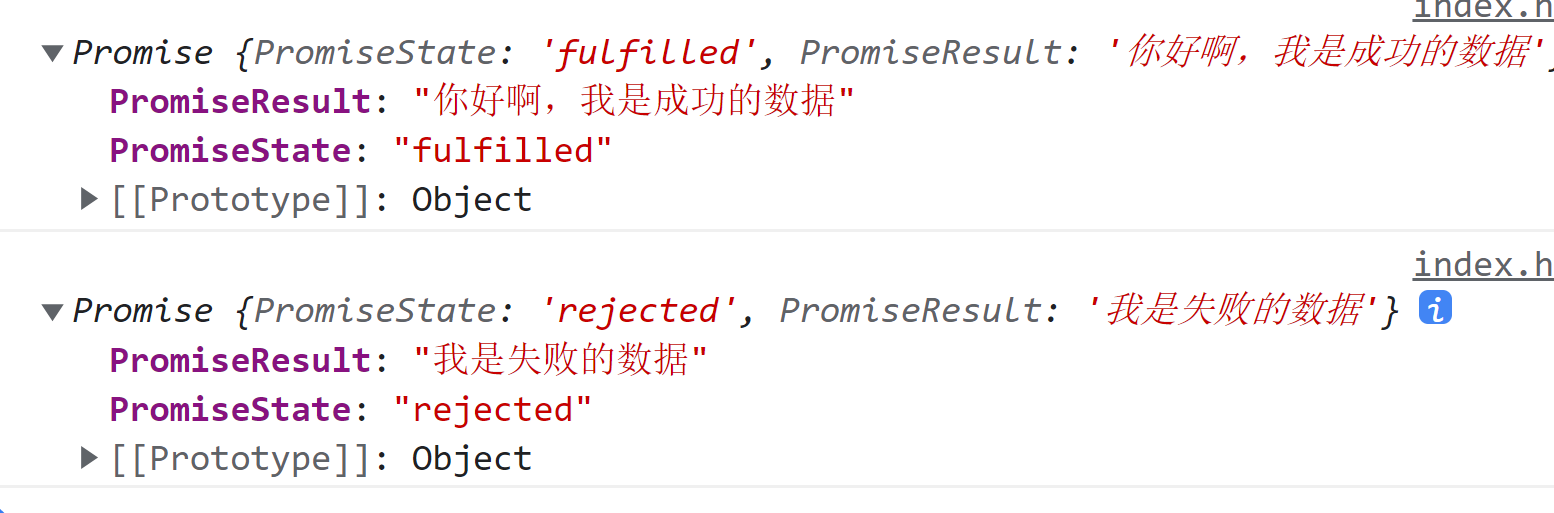
- 调用resove和reject 函数并传值 查看实例
        let p = new Promise((resolve, reject) => {
            resolve('你好啊,我是成功的数据')
        });
        console.log(p);

        let p1 = new Promise((resolve, reject) => {
            reject('我是失败的数据')
        });
        console.log(p1);
2
3
4
5
6
7
8
9
# 5.then 方法的支持
then 方法的特点:
Promise 实例可以通过.then() 方法传递一个函数 过去,这个函数可以携带一个参数(就是成功的返回值)
then 方法传递的第一个函数,只有在成功状态下才可以调用
其实then 方法是可以传递两个函数的,这里我们暂时不做第二个参数的考虑
- 原生的then 方法的使用方式
    new Promise((resolve, reject) => {
            resolve('你好啊,我是成功的数据')
        }).then(res => {
            console.log('then拿到的数据:', res); //then拿到的数据: 你好啊,我是成功的数据
        })
2
3
4
5
- then 方法的基础封装
// 定义Promise 类
class Promise {
    // 定义三个状态 作为类的静态属性
    static PENDING = 'pending'
    static FULFILLED = 'fulfilled'
    static REJECTED = 'rejected'
    constructor(fn) {
        // 默认状态 为 pending
        this.PromiseState = Promise.PENDING;
        // 给返回值 定义默认值 null
        this.PromiseResult = null;
        // 通过bind 将resovle 和reject函数中的this 更改为当前实例对象
        fn(this.resolve.bind(this), this.reject.bind(this))
    }
    resolve(res) {
        // 如果当前的状态为pending 就更改为FULFILLED
        if (this.PromiseState == Promise.PENDING) {
            this.PromiseState = Promise.FULFILLED;
            // 拿到调用传递的成功数据 赋值到实例对象的PromiseResult上
            this.PromiseResult = res;
        }
    }
    reject(err) {
        // 如果当前的状态为pending 就更改为REJECTED
        if (this.PromiseState === Promise.PENDING) {
            this.PromiseState = Promise.REJECTED;
            // 拿到调用传递的失败数据 赋值到实例对象的PromiseResult上
            this.PromiseResult = err;
        }
    }
    // 接收then调用时传递过来的函数
    then(onFulfilled){
        // 如果当前状态是成功的 调用这个函数,并将成功的返回值传递给这个函数
        if(this.PromiseState ==Promise.FULFILLED){
            onFulfilled(this.PromiseResult)
        }
    }
}
2
3
4
5
6
7
8
9
10
11
12
13
14
15
16
17
18
19
20
21
22
23
24
25
26
27
28
29
30
31
32
33
34
35
36
37
38
# 6.catch 方法与异常捕获
catch 方法实现涉及到异常捕获,我们在使用Promise 时 如果出现了代码的执行错误,会自动进入catch 方法的调用,并自动返回一个Error() 错误信息
catch 也支持手动调用,即通过reject() 可以返回的事reject的传递的数据,
# 6.1 catch 手动调用,返回数据
// 定义Promise 类
class Promise {
    // 定义三个状态 作为类的静态属性
    static PENDING = 'pending'
    static FULFILLED = 'fulfilled'
    static REJECTED = 'rejected'
    constructor(fn) {
        // 默认状态 为 pending
        this.PromiseState = Promise.PENDING;
        // 给返回值 定义默认值 null
        this.PromiseResult = null;
        // 通过bind 将resovle 和reject函数中的this 更改为当前实例对象
        fn(this.resolve.bind(this), this.reject.bind(this))
    }
    resolve(res) {
        // 如果当前的状态为pending 就更改为FULFILLED
        if (this.PromiseState == Promise.PENDING) {
            this.PromiseState = Promise.FULFILLED;
            // 拿到调用传递的成功数据 赋值到实例对象的PromiseResult上
            this.PromiseResult = res;
        }
    }
    reject(err) {
        // 如果当前的状态为pending 就更改为REJECTED
        if (this.PromiseState === Promise.PENDING) {
            this.PromiseState = Promise.REJECTED;
            // 拿到调用传递的失败数据 赋值到实例对象的PromiseResult上
            this.PromiseResult = err;
        }
    }
    // 接收then调用时传递过来的函数
    then(onFulfilled){
        // 如果当前状态是成功的 调用这个函数,并将成功的返回值传递给这个函数
        if(this.PromiseState ==Promise.FULFILLED){
            onFulfilled(this.PromiseResult)
        }
    }
    // 这里没有遵循官方的Promise A+ 规范,纯理解角度逆向拆解
    // Promise A+ 2.2.7规范中 是将异常捕获放到了 then方法的第二次参数进行处理
    // 这里丢失了 promise.then().catch()的链式调用语法,这个语法会报错
    // 支持了 promise.catch() 直接捕获异常信息
    catch(onRejected){
        if(this.PromiseState ==Promise.REJECTED){
            onRejected(this.PromiseResult)
        }
    }
}
2
3
4
5
6
7
8
9
10
11
12
13
14
15
16
17
18
19
20
21
22
23
24
25
26
27
28
29
30
31
32
33
34
35
36
37
38
39
40
41
42
43
44
45
46
47
调用测试
new Promise((resolve, reject) => {
            reject('你好啊,我是失败的数据')
        }).catch(err=>{
            console.log('catch拿到的数据:', err); //catch拿到的数据: 你好啊,我是失败的数据
        })
2
3
4
5
# 6.2 代码异常捕获并返回
将constructor 中的代码通过 try..catch 包起来,只要出现异常,直接调用 reject() 传入异常错误即可
// 定义Promise 类
class Promise {
    // 定义三个状态 作为类的静态属性
    static PENDING = 'pending'
    static FULFILLED = 'fulfilled'
    static REJECTED = 'rejected'
    constructor(fn) {
        try {
            // 默认状态 为 pending
            this.PromiseState = Promise.PENDING;
            // 给返回值 定义默认值 null
            this.PromiseResult = null;
            // 通过bind 将resovle 和reject函数中的this 更改为当前实例对象
            fn(this.resolve.bind(this), this.reject.bind(this))
        } catch (err) {
            // 调用reject 更改状态且将Error对象返回
            // 这里是直接调用 原型方法 不需要重新指定this
            //  this.reject 的this就是指向实例对象
            this.reject(err)
        }
    }
    resolve(res) {
        // 如果当前的状态为pending 就更改为FULFILLED
        if (this.PromiseState == Promise.PENDING) {
            this.PromiseState = Promise.FULFILLED;
            // 拿到调用传递的成功数据 赋值到实例对象的PromiseResult上
            this.PromiseResult = res;
        }
    }
    reject(err) {
        // 如果当前的状态为pending 就更改为REJECTED
        if (this.PromiseState === Promise.PENDING) {
            this.PromiseState = Promise.REJECTED;
            // 拿到调用传递的失败数据 赋值到实例对象的PromiseResult上
            this.PromiseResult = err;
        }
    }
    // 接收then调用时传递过来的函数
    then(onFulfilled) {
        // 如果当前状态是成功的 调用这个函数,并将成功的返回值传递给这个函数
        if (this.PromiseState == Promise.FULFILLED) {
            onFulfilled(this.PromiseResult)
        }
    }
    // 这里没有遵循官方的Promise A+ 规范,纯理解角度逆向拆解
    // Promise A+ 2.2.7规范中 是将异常捕获放到了 then方法的第二次参数进行处理
    // 这里丢失了 promise.then().catch()的链式调用语法,这个语法会报错
    // 支持了 promise.catch() 直接捕获异常信息
    catch(onRejected) {
        if (this.PromiseState == Promise.REJECTED) {
            onRejected(this.PromiseResult)
        }
    }
}
2
3
4
5
6
7
8
9
10
11
12
13
14
15
16
17
18
19
20
21
22
23
24
25
26
27
28
29
30
31
32
33
34
35
36
37
38
39
40
41
42
43
44
45
46
47
48
49
50
51
52
53
54
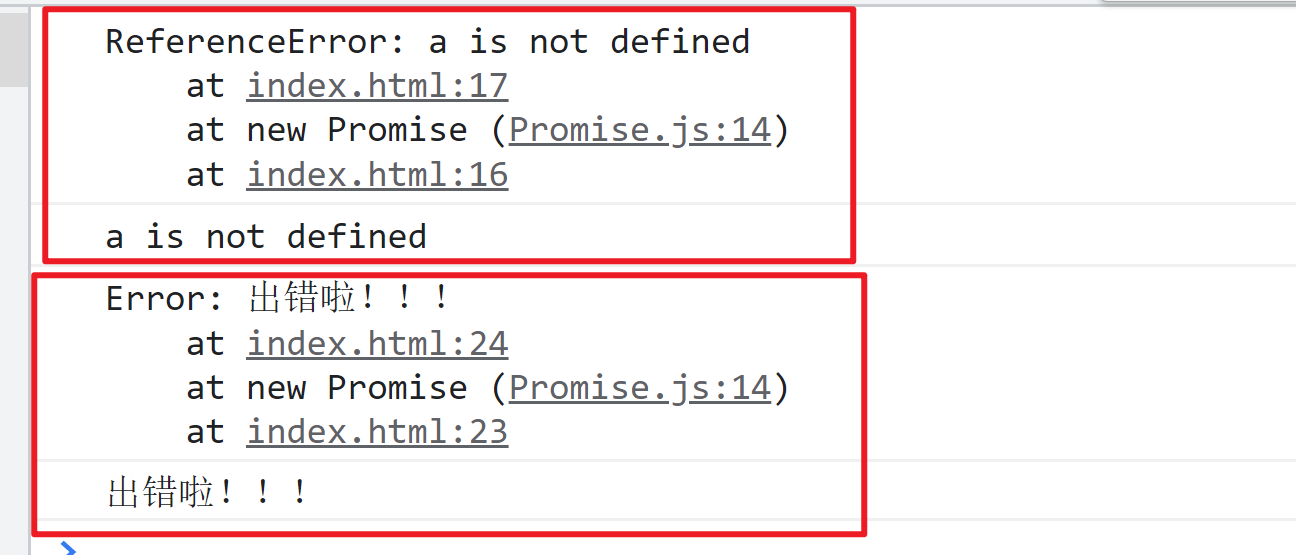
测试自动异常捕获
        new Promise((resolve, reject) => {
            console.log(a);
        }).catch(err=>{
            console.log(err);
            console.log(err.message);
        })

        new Promise((resolve, reject) => {
            throw new Error('出错啦!!!')
        }).catch(err=>{
            console.log(err);
            console.log(err.message);
        })
2
3
4
5
6
7
8
9
10
11
12
13
# 7.基础版Promise-【无注释】
现在的Promise已经具备一定的基础功能,但仍然有许多欠缺
问题1:链式调用未实现,解决回调地狱的核心未实现
问题2:异步概念未加入,微任务没有体现
- Promise.js
class Promise {
    static PENDING = 'pending'
    static FULFILLED = 'fulfilled'
    static REJECTED = 'rejected'
    constructor(fn) {
        try {
            this.PromiseState = Promise.PENDING;
            this.PromiseResult = null;
            fn(this.resolve.bind(this), this.reject.bind(this))
        } catch (err) {
            this.reject(err)
        }
    }
    resolve(res) {
        if (this.PromiseState == Promise.PENDING) {
            this.PromiseState = Promise.FULFILLED;
            this.PromiseResult = res;
        }
    }
    reject(err) {
        if (this.PromiseState === Promise.PENDING) {
            this.PromiseState = Promise.REJECTED;
            this.PromiseResult = err;
        }
    }
    then(onFulfilled) {
        if (this.PromiseState == Promise.FULFILLED) {
            onFulfilled(this.PromiseResult)
        }
    }
    catch(onRejected) {
        if (this.PromiseState == Promise.REJECTED) {
            onRejected(this.PromiseResult)
        }
    }
}
2
3
4
5
6
7
8
9
10
11
12
13
14
15
16
17
18
19
20
21
22
23
24
25
26
27
28
29
30
31
32
33
34
35
36
# 8.Promise 异步实现
特点:Promise 是一个异步代码[异步:微任务与宏任务],Promise为微任务
这里涉及到浏览器事件循环机制event loop
简单说:
同一个事件循环(层级)中,有同步先执行同步,执行完同步再执行异步的微任务Promise,最后再执行宏任务 setTimeout...
Promise 2.2.7规范 针对 Promise 微任务的实现进行了说明:
1.可以使用 setTimeout 进行微任务的模拟实现 (代码稍微复杂化,但是好理解)
2.可以使用新增的专属微任务API: queueMicrotask 进行实现
# 8.1 同步与异步的实现
- 原生Promise 的异步
		console.log(1);
        new Promise((resolve, reject) => {
            console.log(2);
            resolve('成功啦~')
            console.log(3);
        }).then(res => {
            console.log(res);
        })
        console.log(4);
2
3
4
5
6
7
8
9
输出结果
1
2
3
4
成功啦~
2
3
4
5
执行顺序
首先执行 输出
1,这里是同步执行Promise 定义,输出
2,这里仍然是同步调用resolve ,进入then,then方法是一个异步,将异步代码放到执行栈 等着外层的同步的代码清空
执行 输出
3这里是外层的同步执行 输出
4这里是外层的同步,最外层的事件循环的执行栈 已经全部清空执行 异步 then里面的代码 输出
成功啦~
- 调用自己封装的Promise
1
2
3
成功啦~
4
2
3
4
5
自己封装的Promise 的调用结果 与 原生Promise 的调用结果并不一致
原因是我们自己的then 方法 没有实现异步操作,仍然是同步,执行顺序就是从上之下的顺序
实现异步思路:
通过 setTimeout 将then 方法 和catch 方法里面的内容 都包起来,实现异步效果
class Promise {
    ...
    then(onFulfilled) {
        // 实现异步
        setTimeout(() => {
            if (this.PromiseState == Promise.FULFILLED) {
                onFulfilled(this.PromiseResult)
            }
        })
    }
    catch(onRejected) {
        // 实现异步
        setTimeout(() => {
            if (this.PromiseState == Promise.REJECTED) {
                onRejected(this.PromiseResult)
            }
        });
    }
}
2
3
4
5
6
7
8
9
10
11
12
13
14
15
16
17
18
19
现在的结果和原生Promise 的效果一致了,实现了异步效果
1
2
3
4
成功啦~
2
3
4
5
# 8.2 微任务 的实现
- 原生Promise 的微任务
        console.log(1);
        setTimeout(()=>{
            console.log(2);
        })
        new Promise((resolve,reject)=>{
            resolve('成功啦!')
            console.log(4)
        }).then(res=>{
            console.log(res);
        })
        console.log(3);
2
3
4
5
6
7
8
9
10
11
1
4
3
成功啦!
2
2
3
4
5
执行顺序
首先执行 同步任务 输出 1 4 3 ,并清空最外层的执行栈
再执行 promise.then 微任务 输出
成功啦!最后执行 setTimeout 宏任务 输出
2
- 调用自己封装的Promise
1
4
3
2
成功啦!
2
3
4
5
自己封装的Promise 的调用结果 与 原生Promise 的调用结果并不一致
自己封装的promise.then 方法在 setTimeout宏任务 之后执行的,执行顺序出错。
实现微任务思路:
通过 window 新增微任务API: queueMicrotask 替换setTimeout的封装实现
   then(onFulfilled) {
        // 实现异步---微任务api
        queueMicrotask(() => {
            if (this.PromiseState == Promise.FULFILLED) {
                onFulfilled(this.PromiseResult)
            }
        })
    }
    catch(onRejected) {
        // 实现异步--微任务api
        queueMicrotask(() => {
            if (this.PromiseState == Promise.REJECTED) {
                onRejected(this.PromiseResult)
            }
        });
    }
2
3
4
5
6
7
8
9
10
11
12
13
14
15
16
再次运行即可 实现微任务在宏任务之前执行的效果了
# 9.异步版 Promise -【无注释版】
class Promise {
    static PENDING = 'pending'
    static FULFILLED = 'fulfilled'
    static REJECTED = 'rejected'
    constructor(fn) {
        try {
            this.PromiseState = Promise.PENDING;
            this.PromiseResult = null;
            fn(this.resolve.bind(this), this.reject.bind(this))
        } catch (err) {
            this.reject(err)
        }
    }
    resolve(res) {
        if (this.PromiseState == Promise.PENDING) {
            this.PromiseState = Promise.FULFILLED;
            this.PromiseResult = res;
        }
    }
    reject(err) {
        if (this.PromiseState === Promise.PENDING) {
            this.PromiseState = Promise.REJECTED;
            this.PromiseResult = err;
        }
    }
    then(onFulfilled) {
        // 实现异步---微任务api
        queueMicrotask(() => {
            if (this.PromiseState == Promise.FULFILLED) {
                onFulfilled(this.PromiseResult)
            }
        })
    }
    catch(onRejected) {
        // 实现异步--微任务api
        queueMicrotask(() => {
            if (this.PromiseState == Promise.REJECTED) {
                onRejected(this.PromiseResult)
            }
        });
    }
}
2
3
4
5
6
7
8
9
10
11
12
13
14
15
16
17
18
19
20
21
22
23
24
25
26
27
28
29
30
31
32
33
34
35
36
37
38
39
40
41
42
# 10.链式调用
最后的问题: 链式调用 解决回调地狱
promise.then().then().then()
有时间继续