
 vue进阶-keepalive
# 前言:
在开发很多管理系统过程之中,常遇到这种需求,需要对打开路由页面进行缓存,然后在系统页眉提供方便查阅的tab标签进行切换以及对已经缓存页面进行数据刷新和清除数据操作。具体演示如下图所示:

在上面演示中实现了类似window tab标签页效果,会对当前数据进行缓存。在浏览器中实现对路由页面的缓存可以减少接口请求,也方便了用户来回切换想搜索的数据列表。
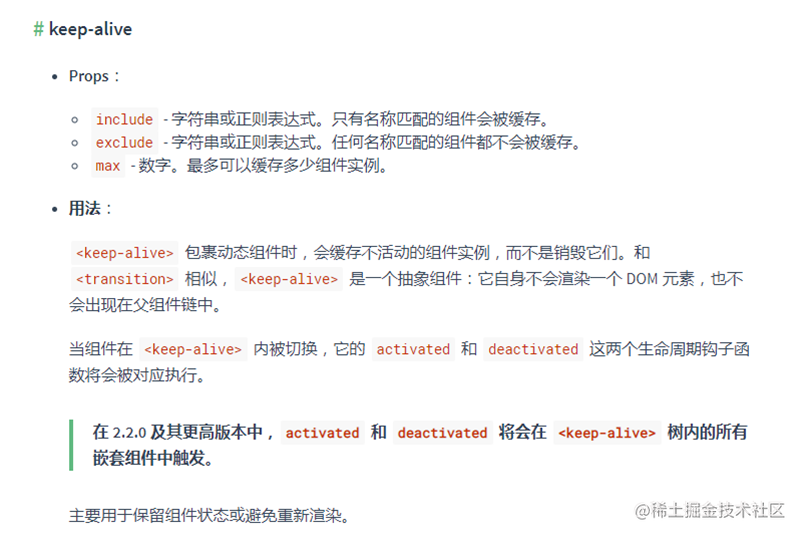
# 原理:
Vue提供的keep-alive API实现对路由组件的缓存。include属性可以绑定一个数组,里面是需要路由组件的path值,可以实现对该路由组件进行缓存,如果不需要对路由进行缓存,直接移除该项元素即可。
官网文档链接: https://v2.cn.vuejs.org/v2/guide/components-dynamic-async.html#%E5%9C%A8%E5%8A%A8%E6%80%81%E7%BB%84%E4%BB%B6%E4%B8%8A%E4%BD%BF%E7%94%A8-keep-alive
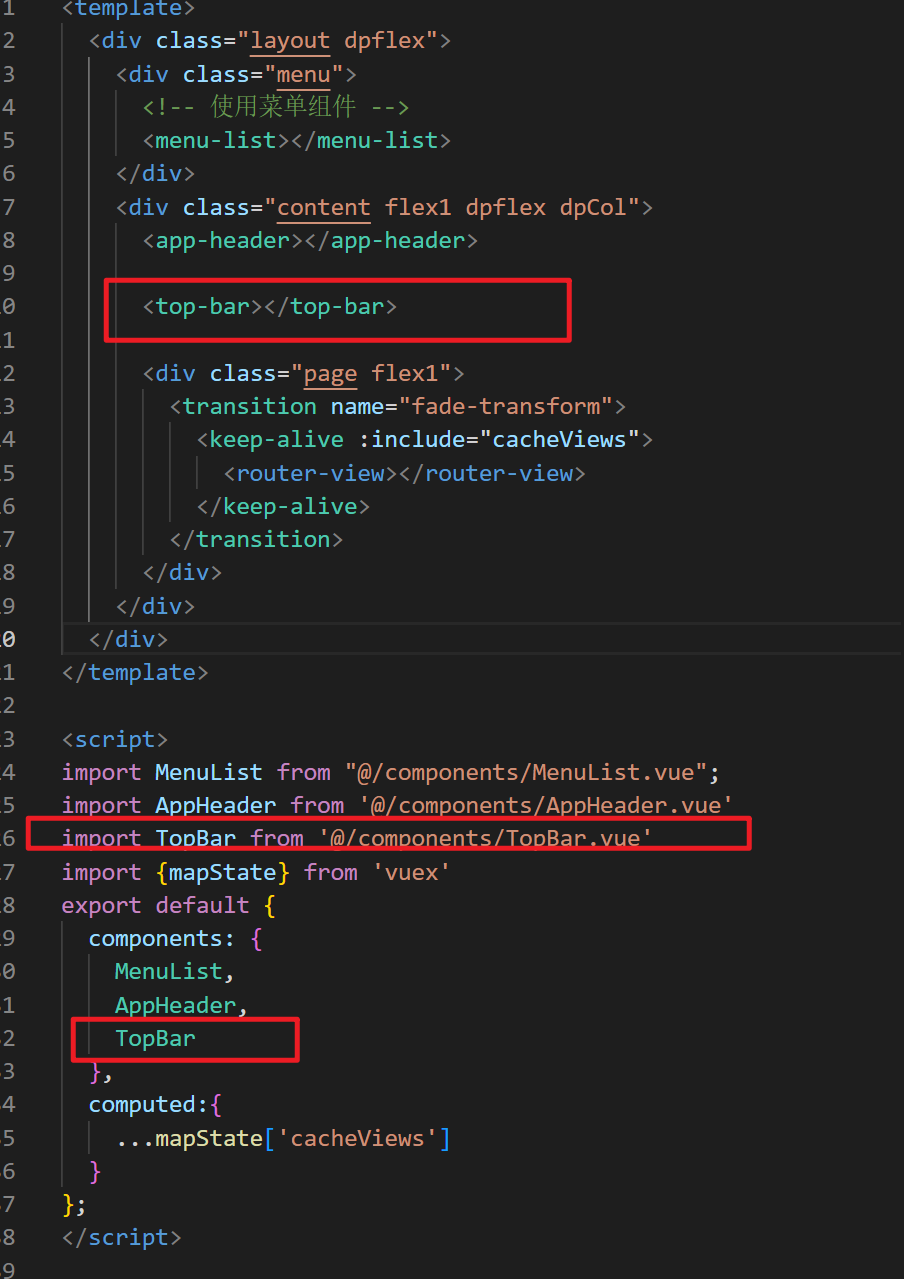
# 1.创建TopBar.vue 组件并导入到父组件中
<template>
    <div class="top-bar">
        <el-tag
         class="tag"
         :effect="$route.path == item.path ? 'dark' : 'plain'"
         closable
         v-for="(item,index) in cacheViews"
         :key="index"
         @close="closeTag(index)"
         @click="changeTag(item)"
         >
         {{ item.meta.title }}
        </el-tag>

    </div>
</template>

<script>
import {mapState,mapMutations} from 'vuex'
export default {
    data() {
        return {
            active: '/home',
            tagList: [
                {
                    path: '/home',
                    meta: { title: '首页' }
                },
                {
                    path: '/accountCenter',
                    meta: { title: '个人中心' }
                }
            ]

        }
    },
    computed:{
        ...mapState(['cacheViews'])
    },
    methods: {
        ...mapMutations(['addCacheView','delCacheView']),
        closeTag(index){
            console.log(index);
            //调用删除路由
            this.delCacheView(index);

        },
        //点击切换
        changeTag(item){
            this.$router.push(item.path)
        }
    },
    created(){
        console.log(this.cacheViews);

    },
    watch:{
        "$route.path"(val){
            this.addCacheView(this.$route)
        }
    }

}
</script>

<style lang="less" scoped>
.top-bar {
    margin-top: 5px;
    width: 100%;

    background-color: #fff;
    padding: 5px;

    .tag {
        margin-left: 5px;
        cursor: pointer;
    }

}
</style>
2
3
4
5
6
7
8
9
10
11
12
13
14
15
16
17
18
19
20
21
22
23
24
25
26
27
28
29
30
31
32
33
34
35
36
37
38
39
40
41
42
43
44
45
46
47
48
49
50
51
52
53
54
55
56
57
58
59
60
61
62
63
64
65
66
67
68
69
70
71
72
73
74
75
76
77
78
79
80
- 父组件导入
# 2.vuex 中存储 目前缓存的路由列表
import Vue from 'vue'
import Vuex from 'vuex'
import router from '@/router'
Vue.use(Vuex)

const store = new Vuex.Store({
    //存数据的仓库
    state: {
        cacheViews: []
    },
    //修改仓库中数据的同步方法
    mutations: {
        addCacheView(state, view) {
            let index = state.cacheViews.findIndex(item => item.path == view.path)
            let { path, meta,name } = view;
            //如果在数组中找不到当前路由就添加到该数组中
            if (index == -1) {
                state.cacheViews.push({ path, meta,name })
                // 添加之后超过10个子路由需要删除第0个
                if(state.cacheViews.length >10){
                    state.cacheViews.shift()
                }
            }
        },
        delCacheView(state, index) {
            //如果删除清空了整个数组就切换页面路由到首页
            if (state.cacheViews.length == 1) {
                state.cacheViews.splice(index, 1);
                router.push('/home')
            } else if (state.cacheViews.length - 1 == index) {
                //如果删除的是最后一个,需要切换路由到删除之后的最后一个
                state.cacheViews.splice(index, 1);
                router.push(state.cacheViews[state.cacheViews.length - 1])
            } else {
                //否则,直接进行删除
                state.cacheViews.splice(index, 1);
            }
        }
    },
    //调用 同步方法 实现异步修改仓库中的数据
    actions: {

    }
})

export default store;
2
3
4
5
6
7
8
9
10
11
12
13
14
15
16
17
18
19
20
21
22
23
24
25
26
27
28
29
30
31
32
33
34
35
36
37
38
39
40
41
42
43
44
45
46
# 3.在路由上 加上切换动画组件 与 keepp-alive缓存路由
include 属性 为当前缓存的路由的 name属性列表
include 接收三种参数:
- 字符串 ‘home,accountList,accountAdd’ [推荐]
- 数组 ['home','accountList','accountAdd'] [推荐]
- 正则表达式: /home|accountList|accountAdd/
include 是通过 name属性列表 匹配 每个组件的name属性,如果包含其中就表示该组件需要被缓存
- 需要缓存的每个路由配置 需要加上 name属性 router/index.js
const routes=[
    {
        name:'home'
        path:'/home',
		....
    },
    {
        name:'accountList',
        path:'/accountList'
        ...
    }
]
2
3
4
5
6
7
8
9
10
11
12
- 每个需要缓存的组件 都必须在 js代码的最前面 加上 name属性
name属性表示 该组件的名称,不同组件的名称均具有唯一性
home.vue
<script>
	export default {
        name:'home',
        data(){...},
            ...
    }
</script>
2
3
4
5
6
7
accountList.vue
<script>
	export default {
        name:'accountList',
        data(){...},
            ...
    }
</script>
2
3
4
5
6
7
- 父页面中 使用
keep-alive进行缓存
    <div class="page flex1">
        <transition name="fade-transform">
          <keep-alive :include="cacheViews">
            <router-view></router-view>
          </keep-alive>
        </transition>
      </div>
2
3
4
5
6
7
 computed:{
		cacheViews(){
            //获取name属性并组成一个新数组   ['home','accountList','accountAdd']
            return this.$store.state.cacheViews.map(item=>item.name);
        }
  }
2
3
4
5
6
7
# 4.生命周期activated 和deactivated
采用了keep-alive缓存的路由组件,重新进入该路由,路由组件不会重新创建,所以也就不会触发组件的生命周期函数(比如说beforeCreate、mounted等)。所以在对该页面进行数据更新或者清除数据。vue为我们提供了activated和deactivated生命周期函数,当重新进入路由组件会触发activated函数,离开则会触发deactivated。
<template>
    <div> A page</div>
</template>
<script>
    export default {
        data(){
            return {
                form :{
                    name:'',
                    password:''
                }
            }
        },
        activated(){
            this.getList()
        },
        deactivated(){
            Object.keys(this.form).map(key => {
                this.form[key] = ''
            })
        }
    }
</script>
2
3
4
5
6
7
8
9
10
11
12
13
14
15
16
17
18
19
20
21
22
23